Easel perfection
June 27, 2013
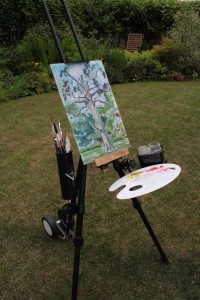
Above: A David Potter portable easel with my own personalised storage attachments
Portable Easel
Do you love to paint outdoors, but hate the hassle of getting all the equipment organised? Perhaps, like me, you need the freedom to paint wherever you choose, and the ability to move to a fresh viewpoint whenever you feel like it? In the British summer, it is of course a good idea to be so mobile that you can get under cover quickly when rain gets too heavy.
With a standard wooden sketching easel, I have endured embarrassing situations in which the opening up of my easel has been the “main show” for passers-by, and I have then had to hold the structure steady with one hand while painting with the other. But this summer, I have a system that works at long last….
Pictured above is my new portable sketching easel from David Potter. I like it for its stability, and for the ease with which it can be opened up and folded away. Telescopic legs are secured with easy open-shut clips, and there is a neat single knob to secure the angles of the legs and of the canvas support. So far, I have not got too exasperated or needed pliers.
For further details about this easel, check out the David Potter website. Ordering seems to go most smoothly if you contact the company directly by phone. I’ll warn you that this easel is more expensive than many others on the market, though it does a far better job. Thank you, lovely family, for getting me this for my last birthday.
Brush holder
There are small and large wooden shelves available for this David Potter easel. However, I personally failed to get on with the design of these, finding them rather unwieldy. As I like to move frequently from one painting location to another, I really need accessories that can remain attached to the easel when it is folded and then opened up again.
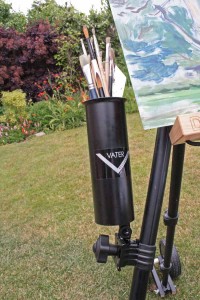
I was very proud to discover this brush holder, which is in fact a drumstick holder designed for musicians:
Above: Vater multiple drumstick holder, here shown clamped to my David Potter easel.
This is a good size for most brushes and palette knives, and it clamps on really securely to the leg of the easel. I can certainly leave this brush holder clamped in place when I pack away at the end of the session, and I even leave the brushes in there when I wheel my easel. Click on the product image below for further details:
Palette shelf
Yes, I know… I could get a beautiful wooden pochade box for oil painting outdoors. However, I’m very attached to my white plastic palette as it is easy to wipe clean, light to carry and because I can see the colours so clearly. Sometimes I hold my palette with my left hand while painting with my right, but I like to have the option of putting it down at times.
Too often, I used to find myself putting the loaded palette down on the ground while I worked, and then nearly standing in my own paint!
This week, my brilliant solution involves a metal clamp-on shelf and a set of small magnets. I have found a black, rectangular clamp-on metal “gig tray”:
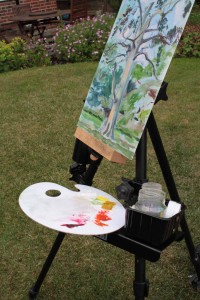
Here is the same tray in use on the easel:
Above: Kinsmore gig tray used as a shelf . Here it is shown clamped upside-down to my David Potter easel, supporting a palette and plastic box that have magnets glued to their undersides.
The Kinsmore tray attaches very firmly to the leg of the easel. But I wanted to have my palette, etc., rest securely on the shelf even in high winds and even when the angle of the easel legs causes the shelf to slope. My solution was to superglue several tiny molybdenium magnetic discs to the underside of my palette. The magnets secure my palette to the shelf very reliably, but I can still pick the palette up with an easy flourish when I feel like painting with it in my left hand.
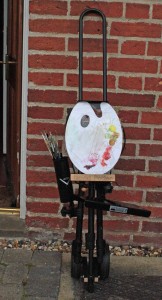
As part of the easel itself is also metallic, I can attach the palette securely like so when the easel is folded up:
Above: Oil palette attached with magnetic fixings to my easel ready for transport.
It is safe to stow the palette like this even when wheeling the folded easel through the park, though I do wrap cling-film over exposed paint just in case of accident.
Multimedia use of easel
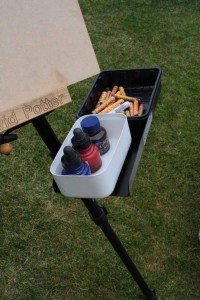
Above: Black, metallic Kinsmore gig tray supporting boxes of art materials. These boxes have magnets super-glued to their undersides.
I tend to accumulate little plastic boxes and trays in the art room, often those that used to contain food. As shown above, these are perfect for carrying all kinds of art materials. I have attached little magnets to their bases to hold them secure on the metal tray. Notice how I’ve chosen to turn the metal Kinsmore tray the “right” way up this time.
For water-soluble media, I have ordered a cup-holder that should clamp onto the easel leg and hold a water jar. On other occasions, I could use this to hold a pot of pencils or pens (the brush-holder is a little too deep for most of these) or of course a cup of coffee. For further details, click on the picture link below:
Wheels
The wheels were ordered from David Potter along with the easel. If you are not built for heavy lifting then I definitely recommend them. They were rather fiddly to attach onto the easel in the first place but are now a permanent fixture, folding back while the easel is in use.
I have been out with the accessorised easel a few times, and it seems okay to wheel it with all my personalised attachments clamped in place and with the palette attached magnetically to the vertical bars. Paint tubes, little screw-top containers of paint medium, a tiny folding tripod stool and boxes of other art materials come along in a separate rucksack.
Magnets
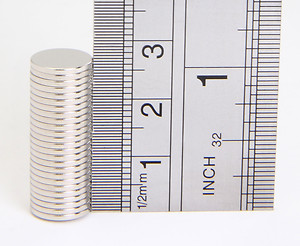 Above: Neodymium magnets. These were used to attach the palette and storage boxes to my metal shelf.
I recommend using neodymium magnets as they are particularly strong. Mine came, promptly and well-packaged, from an eBay store called Guy’s Magnets.
The next step was to glue the magnets to the underside of my palette and art storage boxes. I used Araldite superglue. It is a fiddly business. Plan exactly where each magnet should go before you start, indicating with marker pen if necessary. Before mixing up the glue, check which way up the magnets should go. You want the un-glued side to be attracted to the metal on the easel, not repelled by it!
Some precautions to take when using strong magnets:
Do take care with strong magnets. As far as I am aware, you should not get too close to them if you have a pace-maker. They could also damage some electronic equipment such as ipods if stored too close. And it is definitely a bad idea to swallow them.
Any other ideas?
If you are interested in personalising your own easel, then I suggest browsing online for accessories that clamp onto pushchairs, wheelchairs and music stands Do share any further ideas for personalising an easel by adding to “comments”, below. How about a light fixing? Or a parasol holder!?
I think your solution to the problem of how to clip a palette to the tripod is pure genius. Usually i just hold the palette, but sometimes i really don’t want to! So so clever, to use a gig tray and magnets! I am going to do the same, thanks for the tip.
regards
Chiara
This is just the most brilliant post and has solved all my Extremely Annoying outdoor painting problems in one hit, together with all my supplier-finding issues. You are such a STAR thank you ever so much x
Hi, can your easels be used by wheelchair users with very limited physical capacity.
Thank you
Robert
Hi Robert, this is the easiest easel to open, close and adjust that I have come across so far. Leg length is secured by open-close chunky clip fastenings. There is a chunky screw-type fastening to secure the angle of the canvas support. This needs a little strength to operate, but not much. I suggest that you contact the manufacturers to ask if they have had feedback from wheelchair users.